30 Git CLI options you should know about
Published on 15 September 2014
• 14 min
Cette page est également disponible en français.
You think you know Git? Maybe you do… And yet, I’d bet my shirt that many cool little command-line options remain unknown to you.
Indeed, as Git versions march on, a lot of such options surface, be it about more comfort, more raw power, or additional safeguards. As they are not a new command per se though, they are usually not touted as much and go under your radar.
I selected here about thirty options, spread across roughly fifteen commands, that will make your Git life more enjoyable. This makes for an excellent ROI over your next few minutes of reading!
I will generally put the option right in the section title, intentionally. Still, do not skip a section because you think you know that option: I may use it on another command than the one you think, or for another reason, that may be news to you. Also, I often slap on extra info on associated options and configuration variables.
Partial (un)staging with -p
So you opened a file for a specific reason, perhaps make that damned tracker asynchronous… And you notice in passing that ARIAL roles are missing from a few UX items, and that the footer is still hard-coded instead of coming from the layout, and what not…
When you’re about to commit, you realize that file contains a solid half-dozen (if not more) edits that span multiple unrelated topics. You then have three possible routes:
- You spew a big fat ugly kitchen-sink commit, complete with a lousy message full of “+” signs or, if you’re even lazier, the time-honored useless “Changes,” “Fixes,” “Lots of stuff,” etc.
- You copy-paste the file somewhere then start undo-ing, if that’s even possible, to only keep the first top, commit, re-apply changes for the second, commit again, then the third… All of this by hand, naturally. Screw-up probability: 99%.
- You read this, or attend our training classes, and know
-p!
The git add -p command is actually a refinement of git add -i: it pre-selects the interactive add patch mode. In practice, you tell it what file you want to operate on, to go even faster. For instance:
git add -p index.htmlLet me seize that opportunity to remind you that git add is not about putting a file under version control, but to stage an edit, that is, to confirm that edit as a part of the next commit.
When you perform such an add, Git will auto-split the content in hunks, which are groups of edits, using proximity inside the file, and unchanged lines for splitting. If your edits are too close together, Git will probably not auto-split, and you’ll have to do it yourself using the s key (Git will provide a plethora of possible commands, by their initials, in a prompt. If in doubt, use ? to display help), which here stands for split.
Note that even if you have adjacent edits (edits without unchanged lines between them), you can edit the snapshot on the fly to make it look like what you intend to stage, using the e (edit) command. It’s sort of express Photoshopping for your snapshot. Actually, if you know from the get-go that your file has such adjacent hunks, you can pre-select that mode using the -e option instead of -p. In that case however, Git will not pre-split other hunks for you.
When you’re done, your file will normally appear as both staged and modified. That’s to be expected, as indeed:
- the latest committed version isn’t the same as the staged one: your file thus appears staged.
- the staged version isn’t the same as the file in the working directory: your file thus appears modified.
You can check out the diff for the staged version using git diff --staged index.html. If you want to the see the whole staged snapshot, instead of diffs, you can go with git show :0:index.html (that’s a zero, not an O letter).
After that, be extra careful not to do a git commit -a (for instance, git commit -am "Asynchronous tracker"), as that -a will auto-stage every known edit, thereby overwriting the “sculpted” stage you had put together.
Finally, few people know that git reset also features a -p option, which has the exact same UX as in add, but obviously does the opposite: it unstages selected hunks. It’s often used to split the latest commit, by doing something like this:
git reset -p HEAD^Edits are then presented as cancellations of those in the latest commit. You tell which cancellations you want, amend the commit (see below), then complete the extra commit(s) you want with the remaining modifications.
It’s a very “quick and pro” way of splitting a commit inside an interactive rebase, using its edit command.
Properly account for renames using -A
You may know that, by default (at least before 2.0), git add behaved as git add --no-all or, if you prefer, git add --ignore-removal. It only used the working directory as a basis to compute its list of files to take into account, which therefore included:
- Modifications to known files
- New files
On the other hand, files known to Git’s index but not found in the disk anymore, which appeared as removed, were left aside.
This was a problem for renames and moves, which result in both a “deletion” of the old path, and the apparition of the new one.
To deal with this, we use git add -A, or its longer form git add --all. This takes everything into account. When the index is then aware of both changes, it can “realize” it’s a rename (even if some of the content has changed in the file, too), which later allows git log to follow the file across renames, for instance.
Starting with Git 2.0, this is the default behavior of git add if you provide a path to it (e.g. git add .). By the way, another important change in 2.0: before it, when you did git add -A with no path, it would only work on the current directory and its subfolders, but from 2.0 on, it will work on the entire repository, wherever you are in it.
Get inside untracked directories for status
I’m sure you noticed: when you add a folder to a repo, git status only lists the folder itself as untracked, not its contents. For instance, let’s say I just added a super plugin to my project, with a JS and CSS file inside:
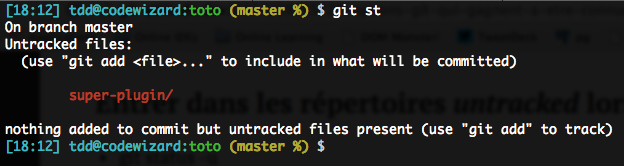
I find that annoying. We can ask status to get inside using -u:
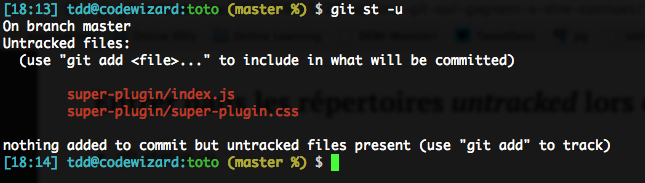
I find this so useful that I set the appropriate configuration variable in my global configuration, so it’s always on:
git config --global status.showUntrackedFiles allProduce more useful diffs
The diffs produced by git diff, git log and git show, to name only these, are nice but definitely have room for improvement. Here are three tweaks that are near and dear to my heart:
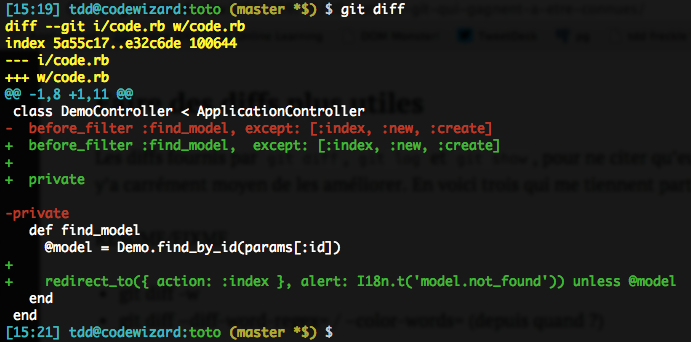
git diff -wOr its longer form, git diff --ignore-all-space (which is indeed more explicit). This option lets diffs ignore any whitespace change inside or on the edge of lines, including going from no whitespace to some, and vice-versa. The one exception is no blank lines to some blank lines, and vice-versa.
This can come back and bite you when you work on files with significant indenting, but for most cases, it’s a great way to “unspam” the display and focus on useful bits.
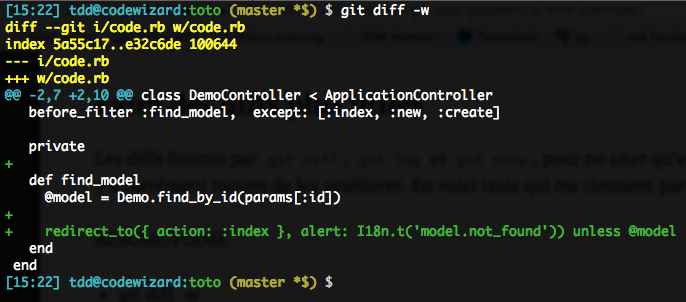
Without -w:
With -w:
Another option I love is about the core display of diffs. By default, it’s a line-by-line thing, which sometimes doesn’t quite cut it:
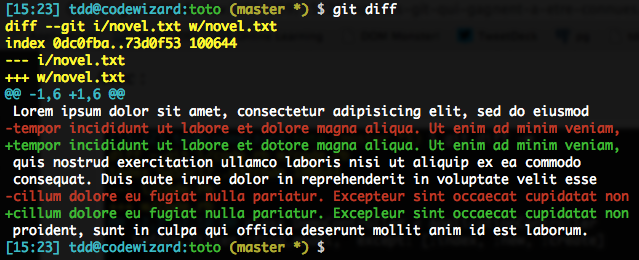
You can start by asking diff to only display the line once, using word delimiters, thanks to the --word-diff option. The definition of “word” here is based on whitespace. For editorial content, that’s just fine:
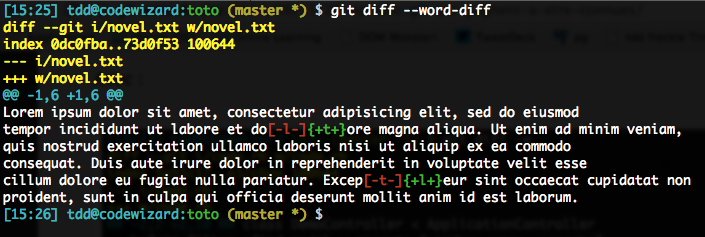
And by the way, if you dislike these +/- brackets, you can use --word-diff=color to spruce this up. Actually, there’s a shorter form called --color-words (ain’t it cute…).
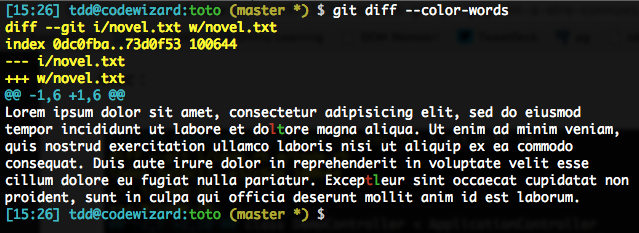
Anyway, this leaves us with a problem when diff’ing code, as whitespace is seldom the only useful delimiter. Just look at this:

To fix this, we’ll go for a regex that says “this is a word.” Taking this to the extreme would be “any character, even just one,” using . (a single period), but if this goes overboard on your specific situation, you can lengthen it, for instance .{3,} for at least 3 characters.
This would result in quite verbose command lines: `–word-diff=color --word-diff-regex=.`` or so. We’ll go for a shorter version:
git diff --color-words=.Here goes:
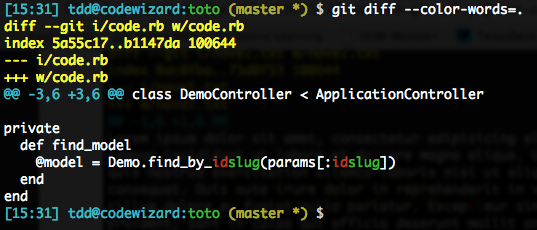
If you want to make such an approach systematical (I often do), you can configure diff.wordRegex to the proper value (e.g. .), so any type of word diff (e.g. --color-words) with no argument will use it (an explicit regex in the CLI will of course have priority).
Fix the latest commit with --amend
When looking at the quick recap displayed after a git commit, one often realizes they just slipped up: forgot a file, committed one file too many, that kind of thing…
An easy way to fix this, as long as you haven’t pushed that commit to your friends, is to put yourself back in the proper situation (e.g. perform the necessary git add, git reset or git rm --cached on the problematic file, perhaps combined with a judicious addition to .gitignore…) then do this:
git commit --amendThis option is actually nothing more than a git reset --soft HEAD^ before the requested commit, but most people do not master reset, so this helps.
Also note that most of the time, the initial commit message was fine. I doubt that you had originally labeled it “Migrating to Bootstrap 3.1, and by the way mistakenly versioning the server’s root password.” In order to avoid having to re-type that message, or simply having the editor pop up, you can do this:
git commit --amend --no-editIf you’re still running on a Git older than 1.7.9 (Gawd, look at what you’re missing!) do this instead:
git commit --amend -C HEADIt’s such a common use case that I often see people alias this as git oops 😀
In your log, only the latest version of the commit is visible: it’s as if you had never slipped up (how good are you!). The former version(s) of the commit of course remain in your reflog, as the general Git principle holds: “if it’s been committed, it’s virtually impossible to lose.”
Smart filtering of logs with -S and -G
The git log command is packed with options (100+!), many of which it shares with its close cousin git diff.
A number of these options are there to filter the log even before displaying it (which is vastly faster and useful than grep’ing it afterwards): filtering based on dates, paths, branches, authors and committers, commit messages… but also diff contents. Specifically, active diff lines.
Diff filtering is extremely useful to hunt down the origin of some code, especially of a bug. Too many people think they should use git blame for this, mostly because of a cargo-culted svn blame reflex, but this command is just as dumb as its svn counterpart:
- It only displays the commit that touched the line last, without telling you why; for all we know, it may just have trimmed trailing whitespace.
- It only displays currently existing lines, so if the issue is that a line was removed, it’s completely useless.
On the contrary, if you filter diff contents, you’ll indeed know which commit introduced the change you’re interested in.
If we’re only interested in the presence of a given text in the diff’s active lines (the +/- lines, not the context lines), regardless of why and how it got there, we’ll usually go with -G (this is regex-based, so do remember to escape regex-special characters):
git log -G 'Secure_?Random' -2 -- path/to/problematic_file(We’re usually only interested in the 1–2 latest commits when doing such a search.)
On the other hand, if we’re specifically looking for diffs that removed or added the text, we’ll go with -S, which only returns diffs that changed the number of occurrences of the text. By default, -S takes a fixed string, but if you want it to be a regex, just add --pickaxe-regex:
git log -S 'Secure_?Random' --pickaxe-regex -2 -- path/to/fileIf you need your texts, or regexes, to be case-insensitive, add -i. Regexes are always processed as extended-syntax (ERE). Finally, if you want to display diffs on the fly (which can make for heavy display, be warned), add the usual -p (all the more reason to filter on the specific file you’re inspecting).
Faster branch handling with -b, -v, -vv
Alright, so first, if you didn’t know yet that git checkout -b creates your new branch on the fly, you now have no excuse.
I mean, why the heck bother with:
$ git branch ticket-12
$ git checkout ticket-12
When you can just go with:
git checkout -b ticket-12Of course, nothing stops you from using the 2nd argument to specify the base for the new branch (which defaults to HEAD, as is often the case with the Git CLI).
Extra tip: checkout is smart about one case where -b becomes superfluous: when you want to start working on a remote branch super-feature and don’t have yet a local tracking branch. You can just go:
git checkout super-featureGit will realize there’s no such local branch, but there is such a branch on the default remote, and will automatically do the equivalent of what follows (assuming here your default remote is called origin, which is common):
git checkout -b -t super-feature origin/super-featureSo why bother with a long call when you can have it short and sweet?
Let’s know talk about -v and its agressive brother, -vv.
You’re probably used to listing your local branches with a simple git branch:

Did you know that you can get much more info (SHA, spread with any upstream, first line of the commit message) with -v?

You could even go so far as to look up the tracked upstreams with -vv:

Ain’t it cool? By default upstreams appear as dark blue, but this sucks on my black background, so I setup color.branch.upstream to cyan…
Easier help with -w
Man pages are well and good, and work everywhere, including through an SSH session… Well, almost everywhere. Several environments don’t handle man very well.
Not only that, but a vast majority of users don’t know how to interact with man other than scroll through it. Leveraging hyperlinks, in particular, is extremely rare.
Git publishes all its docs not only in the manpages format, but also as HTML, a type far easier to use and known to all, links included. To use this format, just add the -w option to git help:
git help -w resetIn a few environments (such as the official Windows installer, I believe) this is actually the default. If you wish to make that happen for you too, you can configure this globally:
git config --global help.format htmlIf the default selected browser isn’t your preferred one (this is determined by git-web--browse, which is aware of a shitload of them), you can force-configure it with help.browser, setting the proper name or command.
These HTML files are stored locally (installed by Git), so you don’t even need an Internet access.
Better stashing with save and -u
Too few people are aware of git stash, and those who do know it seldom look up the doc and learn how to use it well. I see most people just firing up a git stash first, then a simple git stash apply later on.
The default stashing behavior rather blows:
- It leaves untracked files in the working directory, which is rarely what you want;
- it uses a braindead default message, something along the lines of “WIP on master: <whatever the latest commit message was>”.
Such a message is completely useless, as it doesn’t say anything about what the work in progress (WIP) actually is, making it difficult later on to identify what the stash was about.
To fix these to issues, all we need to do is go with the save subcommand and its -u option (which includes untracked files), and provide our custom message. For instance:
git stash save -u 'Beginning of Bootstrap 3 refactoring'You then find yourself on a clean tree: what’s in HEAD, plus ignored files.
Properly getting your stash back is just as hard, once you’re done with whatever emergency had you stash in the first place.
Most people just do a git stash apply, which is too bad because in case of success (i.e. no conflict with your new base state), your stash is kept in the stash list, which could entice you later to try re-applying it. Oops.
What we need is a way, when apply succeeds, to automatically drop. And this is exactly what git stash pop does.
Although its name may suggest otherwise, it doesn’t limit itself to the latest stash: you can specify any stash (e.g. `git stash pop stash@{2}``). That being said, I believe stashes are meant to be short-lived, as a workaround for a complex situation or obstacle, and you should seldom have more than one.
Another gotcha is that apply and pop, by default, do not restore the stage. It is indeed saved individually by save, still by default, so why not auto-restore it, as it is an important piece of information?
This is because stash is a bit of a coward: if you modified a file that was in the stash’s stage, it would have to merge both and re-stage the result. Git usually auto-stages merges (after a merge, rebase or cherry-pick for instance, with or without rerere assistance), but in this instance, it’ll deny it.
So, in order not to have to yell should a merge have to happen in the stage, it will by default not restore the stage: its snapshots will become regular local edits again.
This annoys me to no end, so I always explicitly ask it to restore the stage. Worst-case scenario, it will bump on something and I’ll just have to re-do the command with no stage requirement. So I always use the --index option:
git stash pop --indexUnfortunately, there’s no configuration variable to automate this…
Ah, and yes, it’s super easy to forget you stashed: so be sure to have a solid prompt (e.g. use the ones provided by the builtin scripts for bash/zsh) and use them with a GIT_PS1_SHOWSTASHSTATE=1 environment setup.
Previous active branch: `-``
You probably now that in most shells, cd - takes you back to the directory you were in just before the current one (so using this multiple times toggles you between two directories).
As Git versions marched on, various commands have learned this trick: checkout, merge, cherry-pick and lately rebase. Here’s a typical sequence:
(topic)  $ git checkout master
(master) $ git merge -
And another one:
(2-3-stable +) $ git ci -m "fix: no more _ conflict. Fixes #217."
(2-3-stable)   $ git checkout master
(master)       $ git cherry-pick -
If you’re running a Git version that doesn’t support the dash notation for the command you want (verify this), you can fall back on the universal syntax that dash is syntactic sugar for: @{-1}.
Cancel the current merge yet preserve previous local edits
Git doesn’t really need a clean tree to allow a merge to go ahead: it just needs its working directory to be in good order, which basically means that files to be changed by the merge should not have local edits, and that you shouldn’t have an ongoing stage (to avoid a multi-topic commit eventually).
So when you find yourself wading through merge conflicts, you may have in your working directory both merge conflicts and local edits that were there before you started the merge.
If you decide to cancel the merge for whatever reasons, it is tempting to go with good ol’ git reset --hard. This would actually be dangerous, as it would destroy all local edits that were there before the merge, too.
This is why we have git reset --merge (or its more recent syntax: git merge --abort, which is more in line with its rebase cousin): it resets only changes brought on by the merge.
(master *) $ git merge cool-feature
Auto-merging index.html
CONFLICT (content): Merge conflict in index.html
Automatic merge failed; fix conflicts and then commit the result.
(master *+) $ git merge --abort
(master *) $
You can even do this after a successful merge!
(master *) $ git merge cool-feature
Auto-merging index.html
Merge made by the `recursive` strategy.
[afbd564] Merged `cool-feature` branch
(master *) $ git reset --merge ORIG_HEAD
[ac3489b] Original master tip
(master *) $
Super classy, isn’t it? This spares us some stashing…
Avoid killing a merge when rebasing it
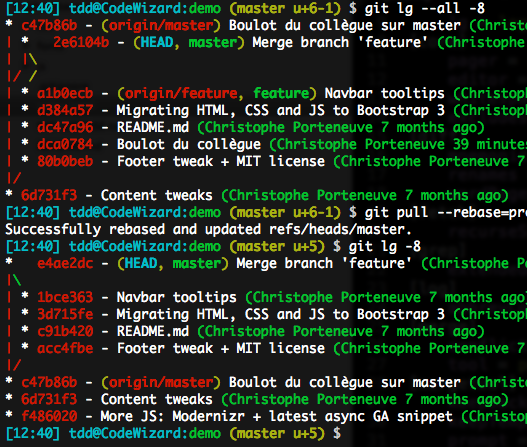
Rebasing is definitely a wonderful Swiss-army knife, with just one little potential risk: by default, when rebasing a merge commit, it inlines the merge. In a nutshell, you run the following risk (here illustrated by a pull that rebases instead of merging, usually a great idea):

To avoid this painful scenario, we can ask rebase to preserve merges, using its -p option, or the longer form --preserve-merges. The result will be similar to what follows, although it uses a different CLI context:
Try to avoid combining that with commit reordering in interactive rebase though, this would yield unexpected results.
Be a rebase ninja with -i
Talking about interactive rebase, this is indeed where rebase really shines, a multi-daily use case being the best-practice reflex of cleaning up your local history before pushing it, which usually goes git rebase -i.
Stripping zero-sum commit pairs/groups (e.g. the original and its revert), reordering commits, merging multiple attempts at one fix, rewriting messages, splitting up kitchen sinks… Everything’s possible!
Safely cleaning up with -i and -n
The git clean command is very useful, but potentially destructive: it does impact the working directory (WD), so it could destroy local edits you never committed, so if you slip up, Git won’t be able to recover your work!
This is probably why, by default, git clean is a no-op, as clean.requireForce defaults to true. You thus would have to git clean -f to start pumping; even then, it would leave directories alone (unless -d) and ignored files too (unless -x).
The good news is, you can see what your clean would do without any risk, with the traditional -n (or --dry-run) option that many Git commands feature: it will list files and folders to be removed, but will stop at listing.
And when you do go ahead, you can gain some confidence by using -i (the traditional --interactive), that will launch a sort of shell listing candidates for removal, and letting you filter them, confirm each, etc. No more anguish!
Set the upstream on the fly with -u
So you’re pushing a branch for the first time? You’ll always need to explictly state what the remote is (even if you only have one defined), and what branch you’re pushing (even if it’s the current one), for instance git push origin topic.
However, this simple push does not set up tracking: your local configuration does not remember the matching between your local topic branch and its upstream, here the topic branch on the origin remote.
To remedy that, you can at any time re-push with an added -u (or --set-upstream), which will persist that configuration for you, in addition to the push proper. This way you don’t have to specify anything for future pushes and pulls.
git push -u origin topicInternally, this relies on git branch --set-upstream-to=origin/topic topic, so if you just want to set this up without pushing just yet, do that.
As a side reminder, you don’t have to track an homonymous upstream: if names need to differ, you’ll just need to use the full push syntax, for instance, to connect a remote christophe-topic branch to your local topic branch:
git push -u origin topic:christophe-topicThis is why the (legacy) remote branch deletion syntax is as follows:
git push origin :old-remote-branchYou’re essentially saying “replace the remote branch old-remote-branch with nothing at all” so… delete it.
Ah well, 36 in the end
Yeah, that’s 36 options (not counting long form variations), and 4 configuration variables, and one environment setting. I can’t help it, I give, I give…